

how to create a table in latex
Why do we need to create tables using commands and environments in LaTeX when someone already took the toll to generate the built-in functions that give out a beautiful user-interface (UI) to create tables to our satisfaction, like in Microsoft Word ?
Literally, we are just a few clicks away from creating our own tables. Well, it is not always about coding, at times, it is about creating with one's own satisfaction; also, sometimes complex tables, which make our MS word document fall apart all of a sudden, need special attention to not let the document go full bizarre. Although it is said that LaTeX tables are for technical documents, I personally think creating tables in LaTeX can help an individual perceive the underlying mechanism (codes and built-in functions) of how your clicks on the UI do justice to the document for creating beautiful tables. So, in simpler words, clicks on the UI are tantamount to the codes being interpreted or compiled in the background. So, you will get to see some of these codes in this article. I aim to make this article as perspicuous as I can so as to anyone with zero coding experience can avail of this beautiful feature in LaTeX .
Speed-Running the Basics of LaTeX:
\ means the start of a command
\ followed by curly braces, together mean an environment which is being called upon
For example, \ something{something}
[something] means an optional argument for that command-environment
\documentclass[10pt]{article} means we want our document to be an article with a font size of 10.
\usepackage{multirow} is used to call out some built-in packages which will help LaTeX understand the commands used for multi-row tables. Similarly, other packages are used as well.
\begin{document} means we want LaTeX to start our document at the instance this command is executed.
\end{document} means we want our document to end here.
% preceding any line means a comment-line
Now, for tables, we need a few packages in addition to typical math packages.
\usepackage{amsmath}
\usepackage{booktabs}
\usepackage{multirow}
\usepackage{float}
\restylefloat{table}
\usepackage{siunitx} % Required for alignment\sisetup{
round-mode = places, % Rounds numbers
round-precision = 2, % to 2 places
}
We will go through them one by one. \usepackage{amsmath} is used for certain mathematical terms (double or triple integral). \usepackage{booktabs} is to create beautiful tables and they are quite catchy as well. Then, \usepackage{multirow} and \restylefloat{table}, are used for creating tables which have multi-rows. \usepackage{float} is needed to position the table in a certain manner. The rest of the part is needed for the decimal alignment of numbers- aligning numbers with respect to the decimal point. You do not need to cram these, rather just ignore them for now, or copy-paste them in your TeX editor.
First, we need to create a table-environment and then a tabular environment. The former is used for captions and the latter is used to input the values and margins (horizontal and vertical lines). They go like this:
\begin{table}[…]
\caption{Table 1}
\begin{tabular}{…}
.
.
.
\end{tabular}
\end{table}
Tables without Margins:
\begin{table}[h!]
\begin{center}
\caption{Numbers-only Table in \LaTeX}
\label{Table 1}
\begin{tabular}{c c}
10 & 20\\
25 & 46\\
\end{tabular}
\end{center}
\end{table}
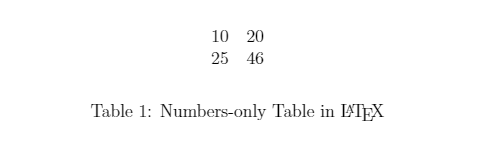
Let's break the code-snippet down for a better understanding. \begin{table}[h!] means the start of our table creation, where [h!] refers to the float specifier "Here, forcefully". h is for here, and ! is for forcefully. This, basically, means we want our table to be created at the position of our LaTeX source-code. We can use other float specifiers too- t for the top of the page, b for the bottom of the page, p for a special page for floats only. \begin{center} is used to center-align something, such as caption in this case: \caption{Numbers-only Table in \LaTeX}. \label{Table 1} is for labeling our table. \begin{tabular}{c c} is a crucial source-text. It initiates the tabular environment. The c in the curly braces means center-alignment and the number of c's denotes the number of columns. {c c} for two center-aligned columns, {c c c c} for 4 center-aligned columns, {r r} for two right-justified columns, {l l l} for 3 left-justified columns, {l c r} for 3 columns: left-justified, center-justified, and right-justified, respectively.
Then, we need to insert values for our table. the subsequent column values are separated by an ampersand (&). For row-separators, \\ is used.
\\ = Row Separator
& = Column Separator
10 & 20\\
25 & 46\\
10 is inserted as the first column value. Then, an ampersand (&) is to move to the next column. 20 is inserted as the second column value. After that, to shift to the next row (2nd row), we need to use a double backslash, \\. For 2nd-row values (1st column-value of 2nd row and 2nd column-value of 2nd row), we need to insert the values again with ampersands in between them. The last three commands (\end… commands) are just to finish the environment we started at the beginning of our code.
Tables with Margin:
1. Horizontal Lines:
\begin{table}[h!]
\begin{center}
\caption{H-line Table in \LaTeX}
\label{Table 2}
\begin{tabular}{c c}
\hline
10 & 20\\
\hline
25 & 46\\
\hline
\end{tabular}
\end{center}
\end{table}
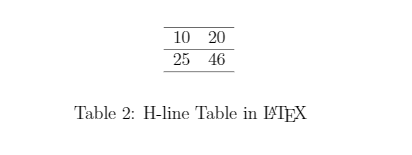
The main difference between the first two tables is the horizontal margins. We can create them at the top or middle or bottom of the table by declaring \hline at the desired position. For double horizontal margin, we can use
\hline \hline. You can look into the ' hhline' package for fancier-looking margins.
2. Vertical Lines:
\begin{table}[h!]
\begin{center}
\caption{V-line Table in \LaTeX}
\label{Table 3}
\begin{tabular}{ | c | c | }
10 & 20\\
25 & 46\\
\end{tabular}
\end{center}
\end{table}

For vertical margins, we need to specify a bit differently than in the case of horizontal lines. We can insert vertical tabs, |, in the tabular environment declaration code to specify the vertical margins.
\begin{tabular}{| c | c |} = Columns separated by 3 vertical margins
\begin{tabular}{ c c } = Columns separated without any vertical margins
\begin{tabular}{ c | c } = Columns separated by 1(middle) vertical margin
\begin{tabular}{| c c |} = Columns separated by 2 vertical margins (no middle margin)
3. Full-Box Tables:
We need to use both \hline and | for tables with boxes.
\begin{table}[h!]
\begin{center}
\caption{Full-box Table in \LaTeX}
\label{Table 3}
\begin{tabular}{ |c|c| }
\hline
10 & 20\\
\hline
25 & 46\\
\hline
\end{tabular}
\end{center}
\end{table}

4. Tables with Decimal-Alignment:
For decimal-alignment, we need to use S instead of c or l, or r. This also rounds off the value up to a certain place. This was indicated in the preamble code-snippet that I mentioned in the packages section of this article. We can change this value as well by setting round-precision = 3.
\usepackage{siunitx} % Required for alignment
\sisetup{
round-mode = places, % Rounds numbers
round-precision = 2, % to 2 places
}
Here, we are using 2-place rounded-off numbers.
\begin{table}[h!]
\begin{center}
\caption{Decimal-alignment Table in \LaTeX}
\label{Table 8}
\begin{tabular}{ |S|S|S| }
\hline
100.00 & 2503.425 & 2.3\\
\hline
.2 & 4.5 & 67.889\\
\hline
\end{tabular}
\end{center}
\end{table}

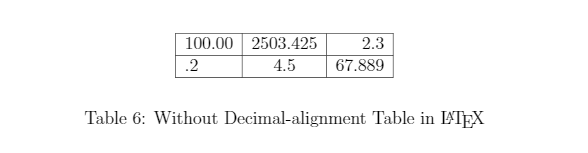
5. Tables without Decimal Alignment:
Without decimal alignments, the table will not look like a complete table. It feels like something is missing. Just look at the following table with a simple left-, center-, and right-justified table for example. Everything is the same except for the following code-line:
\begin{tabular}{|l|c|r|}
Multi-column Tables:
There will be a situation where we have to merge multiple columns as they will have the same heading.
Command:
\multicolumn{NUMBER_OF_COLUMNS}{ALIGNMENT}{CONTENT}
Example:
\multicolumn{5}{c}{Hello}
Here, {5} signifies 5 columns are to be merged, {c} means the heading of the merged cell will be center-justified, and {Hello} is the heading of the merged cell.
Code:
\begin{table}[h!]
\caption{Multi-column Table}
\centering
\begin{tabular}{l c c rrrrrrr}
\hline \hline
Audio & Audibility & Decision & \multicolumn{7}{c}{Sum of Bits} \\ [1ex]
\hline
Police & 5 & soft & 1 & -1 & 1 & 1 & -1 & -1 & 1\\
Beethoven & 5 & hard & 8 & -8 & 2 & 8 & -8 & -8 & 6\\
\end{tabular}
\end{table}
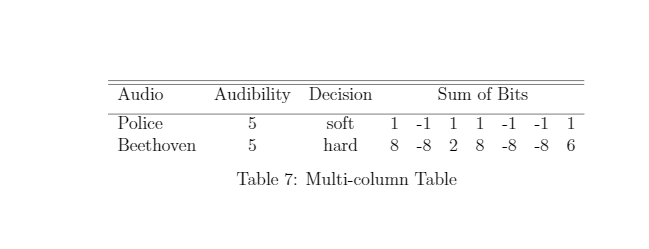
Here, \multicolumn{7}{c}{Sum of Bits} is the new command environment where {7} means we need 7 columns to merge into a single column. Then, {c} means the center-alignment of that merged cell (column), and {Sum of Bits} is the input of this column. \\[1ex] is used to insert a blank vertical space of 1 length after the \multicolumn… command. The space between the first row (Audio Audibility Decision Sum of Bits) and the horizontal line above the 2nd row (police 5 soft …..) is increased by using \\[1ex]. We can use \\[1.5ex] for more space if we need it.
Multi-row Tables:
We need to use \usepackage{multirow} in the preamble for this case.
Command:
\multirow{NUMBER_OF_ROWS}{WIDTH}{CONTENT}
Example:
\multirow{2}{*}{12} refers to the case where we want to merge 2 rows with arbitrary width and the value is 12. {2} means 2 rows, {*} means an arbitrary width of the merged row, and {12} is the content of that row. * basically means the width will be automatically generated by LaTeX .
Code:
\begin{table}[h!]
\begin{center}
\caption{Multirow table.}
\label{tab:table1}
\begin{tabular}{l|c|r}
\textbf{A} & \textbf{B} & \textbf{C}\\
$\alpha$ & $\beta$ & $\gamma$ \\
\hline
\multirow{2}{*}{12} & 1111 & a\\
& 101 & b \\
\hline
3 & 2311 & c\\
4 & 2511 & d\\
\end{tabular}
\end{center}
\end{table}
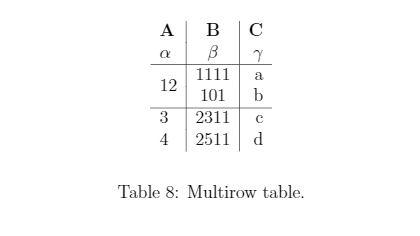
1st Row: A B C
2nd Row: α β γ
3rd Row: 12 1111 a
4th Row: 12 101 b
5th Row: 3 2311 c
6th Row: 4 2511 d
\multirow{2}{*}{12} means we are merging 2 rows with arbitrary width for the merged-row and the content is 12. Since we just merged the first column's 2 rows (row 3 and row 4), we have to skip the 1st column's 4th-row value with a blank space followed by an ampersand in the code:
\multirow{2}{*}{12} & 1111 & a\\ = 3rd row's 3 column values: 12 1111 a
& 101 & b\\ = a blank for 4th row's 1st column that is already merged with 3rd row's 1st column ( 12 ) and an ampersand (&) followed by the 2nd column value ( 101 ), an ampersand (&) , and the 3rd column value ( b ).
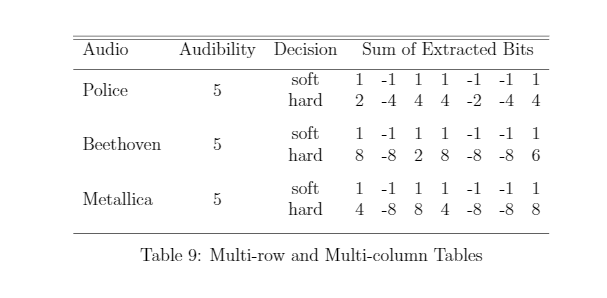
Multi-row and Multi-column Tables:
Individual:
Here, the multirow and multicolumn commands are used individually and they do not interact with each other, unlike in the nested case where they are co-dependent.
\begin{table}[H]
\caption{Multi-row and Multi-column Tables}
\centering
\begin{tabular}{l c c rrrrrrr}
\hline \hline
Audio & Audibility & Decision & \multicolumn{7}{c}{Sum of Extracted Bits}\\ [1ex]
\hline
\multirow{2}{*}{Police} & \multirow{2}{*}{\(5\)} & soft & 1 & -1 & 1 & 1 & -1 & -1 & 1\\
& & hard & 2 & -4 & 4 & 4 & -2 & -4 & 4\\ [1.5ex]
\multirow{2}{*}{Beethoven} & \multirow{2}{*}{\(5\)} & soft & 1 & -1 & 1 & 1 & -1 & -1 & 1\\
& & hard & 8 & -8 & 2 & 8 & -8 & -8 & 6\\ [1.5ex]
\multirow{2}{*}{Metallica} & \multirow{2}{*}{\(5\)} & soft & 1 & -1 & 1 & 1 & -1 & -1 & 1\\
& & hard & 4 & -8 & 8 & 4 & -8 & -8 & 8\\ [1.5ex]
\hline
\end{tabular}
\end{table}
Nested:
\begin{table}[H]
\caption{Nested Multi-row and Multi-column Tables}
\centering
\begin{tabular}{l c c rrrrrrr}
\hline \hline
Audio & Audibility & Decision & \multicolumn{7}{c}{Sum of Extracted Bits}\\ [1ex]
\hline
\multirow{2}{*}{Police} & \multirow{2}{*}{\(5\)} & soft & \multicolumn{7}{c}{\multirow{2}{*}{34}} \\
& & hard &\\ [1.5ex]
\multirow{2}{*}{Beethoven} & \multirow{2}{*}{\(5\)} & soft & \multicolumn{7}{c}{\multirow{2}{*}{45}} \\
& & hard & \\ [1.5ex]
\multirow{2}{*}{Metallica} & \multirow{2}{*}{\(5\)} & soft & \multicolumn{7}{c}{\multirow{2}{*}{49}} \\
& & hard & \\ [1.5ex]
\hline
\end{tabular}
\end{table}
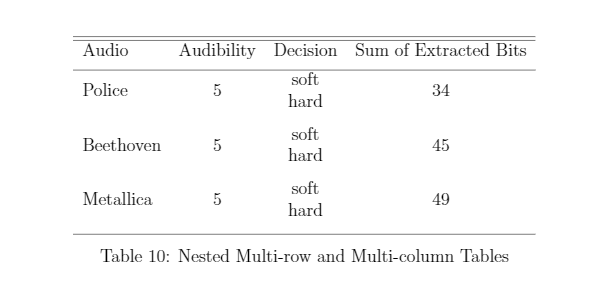
Here, the bold lines dictate the code for the nested column-row.
\multicolumn{7}{c}{\multirow{2}{*}{34}} refers to a nested section where the \multirow{2}{*}{34} is nested inside the CONTENT of the \multicolumn command.
\multirow{2}{*}{34} is the content of \multicolumn{7}{c}{..}
This has turned out to be a very long article and I do not want to stretch it anymore. I will continue writing lucid articles on LaTeX if I get positive feedback on this. Thank you for reading my article.
LaTeX Source Code: https://drive.google.com/drive/folders/1gP8GPZnNjZyP9Mq-XZH0Bp-BI8Hfkwbl?usp=sharing
how to create a table in latex
Source: https://levelup.gitconnected.com/how-to-create-tables-in-latex-in-laymans-terms-391f8478aa80
Posted by: shustermuder1970.blogspot.com
0 Response to "how to create a table in latex"
Post a Comment